Refill Instructions
superInk compatible inks
for Brother printer
|
|
||
マニュアルダウンロード |
Download Instructions |
Scarica le Istruzioni |
|
|
||
|
Dear customer, thank you for purchasing a superInk product. For more detailed refill instructions, tips and printing tests, please select the most appropriate reference for your printer model from the Refill Instructions menu. |
||
|
|
||
Recommendations• Always follow the refill instructions with the utmost care. Do not to refill cartridges that have been empty for a long time or completely depleted. Best results are obtained by refilling the cartridges before the ink is completely depleted. |
||
|
|
||
|
|
||
|
|
||
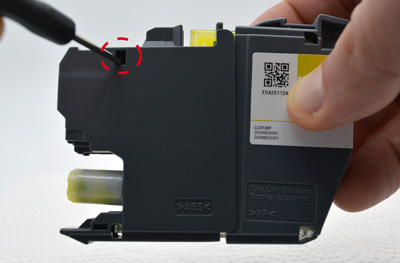
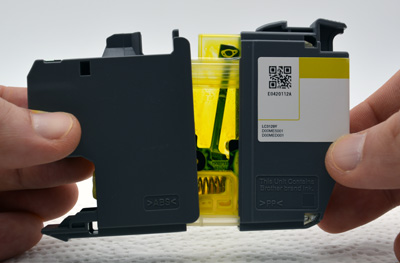
“Double shell” cartridges |
||
 |
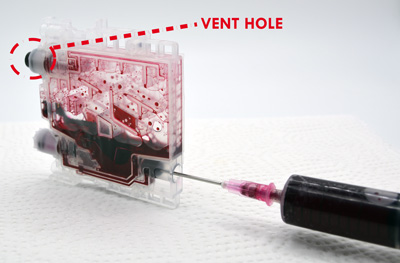
• Almost all of the Brother cartridges consist of an external plastic shell (divided into 2 parts) containing the ink tank • Place the cartridge as shown (photo 1) and locate the 4 holes containing the retention flaps • With a small flat-blade screwdriver, press and push outwards (or inwards, depending on the position) to release each flap from the retention hole (photo 2) • Separate the front part (photo 3) and, if necessary, the rear part of the shell • Once the ink tank has been extracted from the protective shell, you can drill a small hole of about 2 mm in diameter (photo 4) which will be used to refill the ink. • Inject the ink needed for refilling (picture 5) • Clean the refill hole with a paper towel and seal it with adhesive tape (picture 6) or with hot glue (alternatively we recommend using the colored silicone plugs of our “Refill Set” to speed up subsequent refills and avoid any errors with the different colors) • Reposition the ink tank inside the back of the shell and close it with the front part, paying attention to ink leaks [WARNING] CARTRIDGE / INK LEVEL RESET (only for cartridges with microchip) |
|
| Picture 1 | ||
 |
||
| Picture 2 | ||
 |
||
| Picture 3 | ||
 |
||
| Picture 4 | ||
 |
||
| Picture 5 | ||
 |
||
| Picture 6 | ||
|
|
||
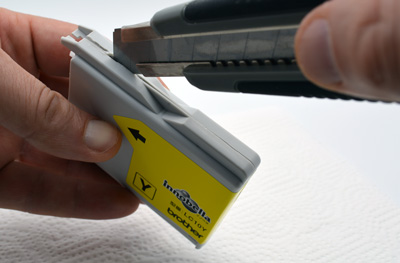
LC10 series cartridges (Black and Colors) |
||
 |
• With a cutter, first separate the label as indicated (picture 1) and then continue along the entire perimeter (picture 2) in order to make the shell separation easier • Remove the ink tank from the protective shell and drill a small hole of about 2 mm in diameter (picture 3), which will be used for refilling the ink. • Inject the ink needed for refilling (picture 4) • Clean the refill hole with a paper towel and seal it with adhesive tape or with hot glue (alternatively we recommend using the colored silicone plugs of our “Refill Set” to speed up subsequent refills and avoid any errors with the different colors) • Reposition the ink tank inside the shell, paying attention to ink leaks [WARNING] CARTRIDGE / INK LEVEL RESET |
|
| Picture 1 | ||
 |
||
| Picture 2 | ||
 |
||
| Picture 3 | ||
 |
||
| Picture 4 | ||
|
|
||
LC11 and LC16 series cartridges (Black and Colors) |
||
 |
• Position the cartridge as shown and, using a small flat-blade screwdriver, pry out the front part of the cartridge shell (photo 1) • With a cutter, separate the label as shown (picture 2) and remove the 4 internal retaining wedges (picture 3), paying attention not to damage the ink tank film inside • Remove the ink tank from the protective body and refill the ink through the indicated hole (picture 4). • Reposition the ink tank inside the shell and re-install the front part, paying attention to avoid any [WARNING] CARTRIDGE / INK LEVEL RESET |
|
| Picture 1 | ||
 |
||
| Picture 2 | ||
 |
||
| Picture 3 | ||
 |
||
| Picture 4 | ||
|
|
||
LC09 series cartridges (Black and Colors) |
||
 |
• Position the cartridge as indicated and drill a hole of about 2 mm in diameter as indicated (picture 1) using a small manual drill (we recommend our “Refill Set” which includes a set of basic tools to be used for normal refilling operations) • Inject the ink needed for refilling (picture 2) • Clean the hole with paper towels and seal it with adhesive tape [WARNING] CARTRIDGE / INK LEVEL RESET |
|
| Picture 1 | ||
 |
||
| Picture 2 | ||