Universal Cleaning Liquid PLUS
for all cartridges
and inkjet print-heads


日本語
マニュアルダウンロード
English
Download Instructions
Italiano
Scarica le Istruzioni


Cleaning Liquid is a liquid designed for removing ink residue and impurities from print head nozzles to restore proper functioning and ensure their durability over time.
The product is compatible with all inkjet printers: Brother, Canon, Dell, Epson, HP, Lexmark, Ricoh etc.

Recommendations

• Use the cleaning liquid at room temperature to facilitate the melting of impurities on the print head (dried ink, micro-paper residues)
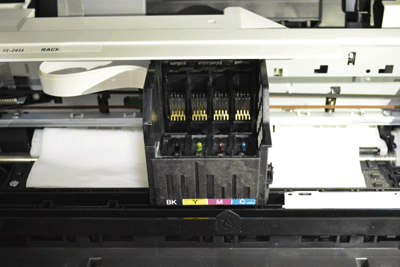
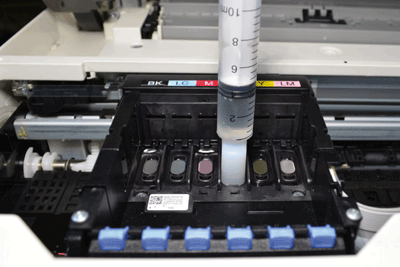
• Prepare a work space to avoid any unwanted stains
• Wear a pair of gloves
• Use only good quality paper towels (paper that is too fine could wear and disperse into the printer and/or print-head)
• Always perform one or more cleaning cycles after the product has been used to completely eliminate any residual liquid on the print head
• If the print quality is not optimal after cleaning, perform another cleaning cycle and consider waiting for a longer period between cleaning and reactivating the printer (dry ink may take hours before dissolving completely). Please keep that in mind if you need to print.


Cleaning of FIXED and REMOVABLE heads

• Place the printer carriage in “cartridge replacement” mode
Unplug the printer power cable
• Remove all cartridges from their seats
• In case of a “fixed” head, place two or more layers of paper towels under the carriage, near the print head (paper will absorb the impurities and the liquid that will spill out of the head during the cleaning process). In the case of a “mobile” head, prepare a container of adequate size for the print head and place it inside.
• Insert the rubber tube (3 sizes available, choose the one that best suits the shape of the printer) and/or the correct adapter (supplied in the package) on the syringe
• Repeat the following steps for each color:
-----> take 2 ml of cleaning liquid
-----> position the tube/adapter at the base of the ink inlet
-----> slowly press the syringe piston and then “inject” the 2 ml of liquid
• Wait a few minutes to allow the cleaning liquid to dissolve impurities and dry ink
• Remove any absorbent paper sheets from under the carriage (in the case of a “fixed” head), paying attention to any spillage of ink/liquid
• Place all the cartridges back in their housing
• Reconnect the power cord and wait for the printer to become ready
• Perform a cleaning cycle with the printer utility
• Through the printer utility, print the nozzle check pattern and check the results

 
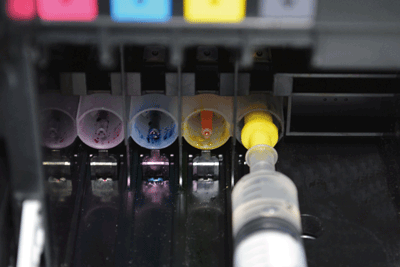
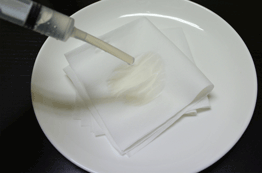
Place paper towel(s) under the print head
 
Head Cleaning (“Brother” and “HP” type)
 
 
Head Cleaning “Canon” type (black) Head Cleaning “Canon” type (colors)
 
Head Cleaning “Epson” type Head Cleaning “Epson” type IC70 / IC80 / ITH series
 
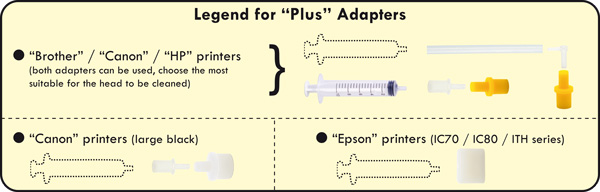
Legend for “Plus” Adapters
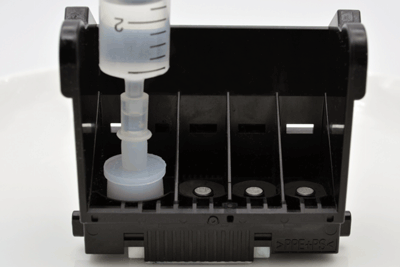


Cleaning a MONO-BLOCK head

• Remove the cartridge to be cleaned from the printer
• Prepare a container of a suitable size to clean the cartridge
• Place paper towels in the container and pour 2-3 ml of liquid into them
• Place the cartridge head on the wet paper towels
• Wait a few minutes to allow the cleaning fluid to dissolve any impurities and the dry ink on the cartridge head
• Take the cartridge and gently wipe the print head with a paper towel (some ink might spill in the process)
• Reinstall the cartridge into the printer
• Wait for the printer to become ready
• Perform a cleaning cycle with the printer utility
• Through the printer utility, print the nozzle check pattern and check the results


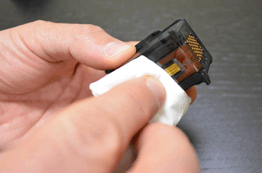
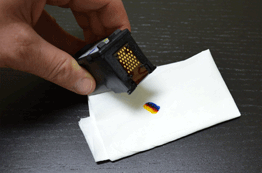
Cleaning a mono-block cartridge “Canon”, “HP”, “Lexmark” type
 
  
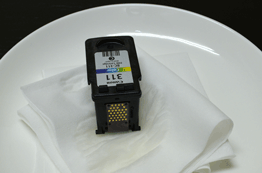
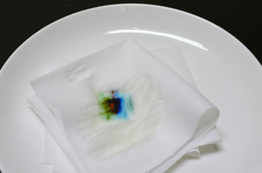
Drying and visual testing


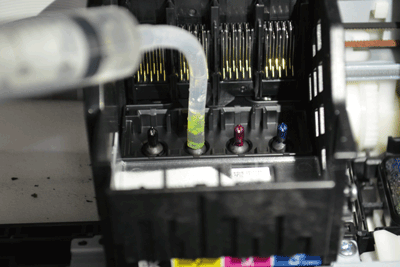
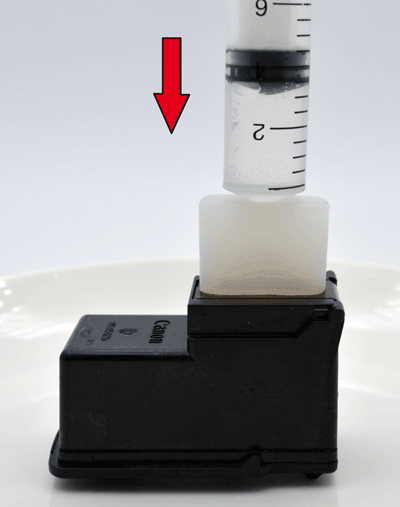
Cleaning of MONO-BLOCK head through adapter

• Remove the cartridge to be cleaned from the printer
• Prepare the work area, keeping in mind that leakage from the cartridge may occur
• Take about 2 ml of cleaning liquid and insert the adapter on the syringe
• Turn the cartridge over as shown in step 1 and apply the adapter to the print head so that it perfectly fits. While keeping the adapter firmly pressed, inject 1 to 2 ml of cleaning liquid into the head (if the adapter is not well positioned, the liquid might spill out of the cartridge; if this occurs, stop the procedure and reposition the adapter)
• Turn the head over again and wait a few minutes to allow the cleaning liquid to dissolve the impurities and the dried ink in the cartridge head
• Now position the cartridge as illustrated in step 2 and start sucking about 2 ml of liquid/ink from the cartridge. This will eliminate the last bit of impurities and any excess air, also restoring the correct ink flow
• Gently gently wipe the print head with a paper towel (some ink might spill in the process) and re-install the cartridge in the printer
• Perform a cleaning cycle with the printer utility
• Through the printer utility, print the nozzle check pattern and check the results


[WARNING] Cleaning using the adapter for “rectangular” heads

We recommend using the following method on mono-block cartridges only if the adapter is able to cover the entire area of the printhead.
If the adapter is too short or does not fit snugly, the cleaning liquid injection and subsequent suction operations may not be successful.
In this case, we recommend using the normal method indicated above.

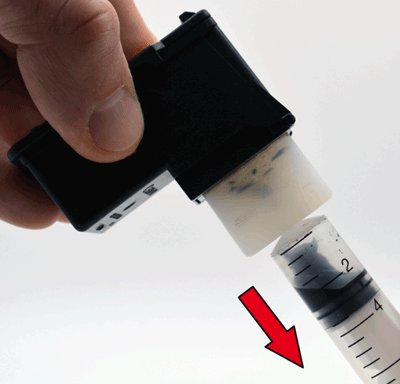
1 - Cleaning Liquid injection
 
2 - Suction of Cleaning Liquid and excess air (priming)


Test pages

After the cleaning operations, we recommend printing some test pages


What is the purpose of printing a test page?

• to allow excess liquid to be expelled from the print head after using our Cleaning Liquid
• to verify the correct functioning of the print head and each individual color
• to verify the correct alignment of the print head
• to exhaust, before refilling, all the ink contained in the cartridge and then proceed to the subsequent filling with another ink of different brand.


WIKI-PRINT

pl (picoliter)
It is the unit of measurement used that defines the size of a single drop of ink ejected from a single print nozzle.
1pl = 1/1,000,000,000,000 liters
 

Print head
The print head is the heart of the printer. It physically “sprinkles” tiny drops of ink that will form the final print.
The latest generation of inkjet printers can spray droplets as small as 1.5 pl through over 1,000 tiny nozzles!!! These 1,000+ nozzles form the “print head”.
Therefore, it is important that you choose a high quality ink that will not damage the printable print head over time (or after many recharges) when refilling the cartridges.
superInk is here for this with its latest line of inks!
 

Printing technology
There are essentially two technologies used for the operation of the print heads:


• Thermal (or Bubble-Jet)
At each nozzle a resistor is positioned through which current pulses are passed; at each impulse the resistor warms up to a few hundred degrees in a few microseconds and generates a vapor bubble on contact with the ink. Expansion of the latter causes the expulsion of the drop by the nozzle above; this is the most widespread technology in the Home/Office field and is mainly used by HP (Hewlett-Packard), Canon and Lexmark.


• Piezoelectric
Below each nozzle there is a channel surrounded by a piezoelectric crystal; an electric impulse causes the crystal to change shape and consequently cause pressure in the duct and forces the ejection of the ink. This is the technology used principally by Brother and Epson for their inkjet printers.
 

Differences between “FIXED”, “MONO-BLOCK” and “REMOVABLE”
The fixed head is inserted directly into the printer and is designed to last for the entire life cycle of the printer.
This considerably reduces maintenance costs since the head does not have to be replaced each time the ink runs out. In addition, printing quality is generally better and does not require any calibration.
Unfortunately, in case of head damage, the replacement cost (if replacement is possible) makes the operation extremely costly, forcing the user to be more likely to buy a new printer.
 

The mono-block head is supplied as part of a replaceable ink cartridge.
Each time a cartridge (ink cartridge) is exhausted, the entire cartridge and print head are replaced with a new one. This increases the cost of consumables and makes it more difficult to make a high-precision head at a reasonable cost, but also means that if the print head is damaged or clogged, the problem can be solved easily: you buy a new cartridge (complete with head) and the printer will print as good as new!
 

Finally, the removable head is a combination of the two previous techniques: the print head can easily be removed from the printer (usually by lifting a lever/hook) and the ink cartridges can be changed when needed.
Many Canon printers and some HP printers use this kind of mixed technology. In this case, the print heads are designed to last for the entire life of the printer, but can be replaced more easily by the user (and more economically) if they are clogged.


Home Refill Instructions